

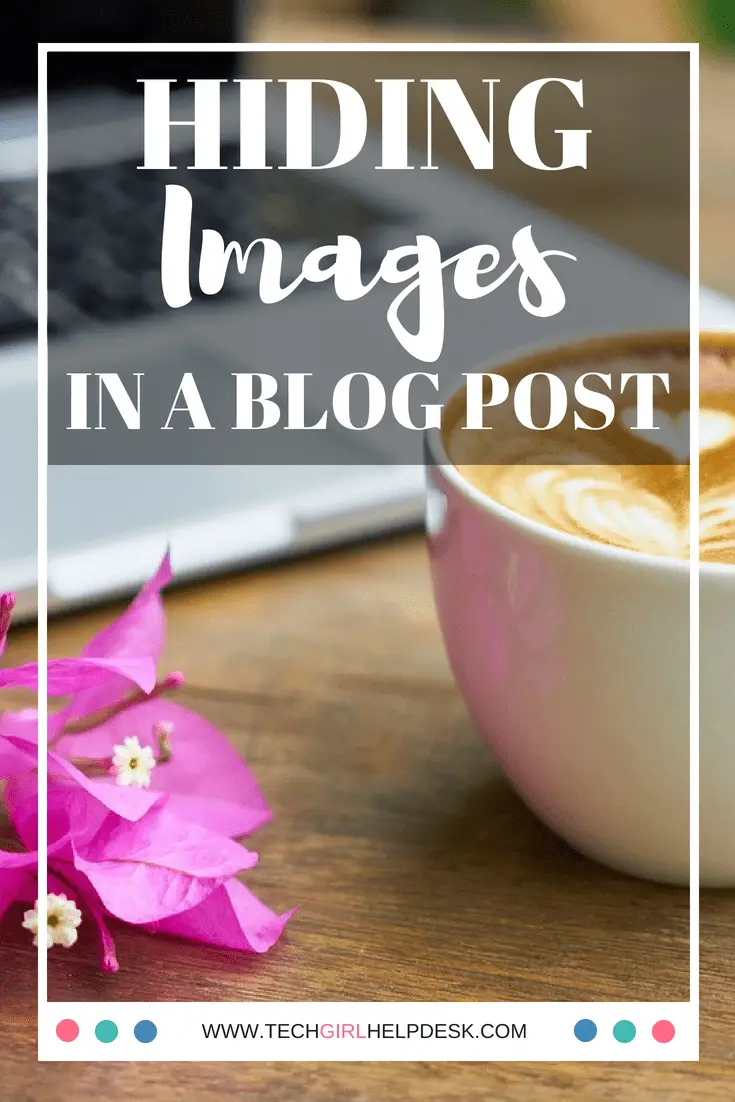
How to hide images in your blog post
Why would you hide images in your blog post??
You might be thinking, “why the heck would I spend valuable time learning how to take stunning photos or spend hard earned money on beautiful stock images just to hide images in my blog post??” (It does seem kinda crazy if you ask me!) Although hiding images sounds a little counterintuitive, it is actually one of the greatest tips that successful bloggers use all the time.
If you have been blogging for any amount of time you have probably heard bloggers sing the praises of Pinterest for their blog traffic. They also say that your Pinterest images should be vertical simply because they take up more real estate on a page and allows your pin to stand out in a sea of other pins.
But while these long vertical images work well on Pinterest, having multiple versions of these long Pinterest images in the middle of your blog post can be an eyesore and makes your site look cluttered. They can also detract from the user’s experience on your site.
Hence, the need for hiding images within a blog post.
Why would you need multiple images?
You may still be wondering why exactly would you need multiple pinnable images in your blog post? Having multiple versions of pinnable images within your blog post allows a blogger to test and research which types of pins do well, and thereby, fine-tuning their image creation techniques. It also allows for growth and change or rebranding as your blog grows and evolves.
Break down of the code to hide images
HTML (Hyper Text Markup Language) has what is called tags that identify various elements within a webpage. The tags are in these <> brackets. So, for example, this <p> is the opening tag for a paragraph and this </p> is a closing paragraph tag. These tags would come at the beginning and end of a paragraph block.
For the hidden image code above it looks a little more complicated because the image is wrapped in a <div> tag, which is just a way of putting the image in its own little “container”.
The code to hide an image is actually CSS (Cascading Style Sheets). CSS describes how HTML elements are to be displayed on the page. It is the part of the code that makes a site look pretty.
<div style=”display:none;”><img src="flower.jpg" /></div>
The HTML tag for an image is the <img> part. Image tags are an exception to the rule about having an opening and closing tags…image tags are self-closing so the ending is closed with just a />.
And just to add another layer of complexity…you can actually just add some CSS directly to the image itself and write the same code like this:
<img src="flower.jpg" style="display: none;" />
(more on this at the very end of the post)
How to hide images in your blog post
There are a lot of bloggers out there that love blogging but when you start talking about code, most of them tend to tune right out. But this little trick is well worth taking the time to learn and is really quite simple.
Here is what you need to do:
Step 1: Create your image
Create your image as you normally would. You can use PicMonkey or Canva or other any other image editing software of your choice.
Step 2: Upload your image
Upload your image as you normally would, either by uploading it directly to your media library from your WordPress dashboard or within your post by clicking the Add Media button at the top of your editor.
Pro Tip: In order to find your images easily, insert them at the very beginning or end of your post.
Step 3: Add your title
Once you upload your image, you’ll see a panel of image info on the right-hand side. In the Title field, insert a title to match your blog post.
Pro Tip: Incorporate your blog name into the title. I always add a “| Tech Girl Help Desk” after the title, so that the entire title looks something like this: “Blog Post Title | Tech Girl Help Desk.”
Step 4: Add ALT text
This is important! Again in the right-hand panel, there will be a spot called Alt Text. When someone pins your image, THIS is what auto-populates for the pin description.
Here too you can include your blog title again and then write a brief description explaining what your blog post is about.
Hint: Double check and make sure there are no spelling or grammar mistakes in the description! If there are typos, once your pin has been pinned to Pinterest your pin could potentially have a description with typos floating around Pinterest forever!!
Step 5: Adjust Image Size
At the bottom of the panel on the right, there is a place where you can adjust the image size. Make sure your image is the Full Size (in our case, 735 x 1102 pixels).
Step 6: Insert the image into your post
Double check everything one more time and then press the button to Insert your image. You should see your image in the blog post!
***** FOR INSTRUCTION ON HIDING IMAGES WITH GUTENBERG, scroll to the section after Step 11 ***** Updated 3/28/19
Step 7: Switch to the Text Editor
Up to this point, we have been working in the Visual Editor of WordPress as you normally would to write your post. At the top of your Editor box, there are two tabs: Visual and Text. Switch over to the Text tab. This is where you will insert your code to hide the image.
Step 8: Prepare to Insert the code
If you followed the Pro Tip in Step 2, you will be able to easily find your image when you switch over to the Text Editor, either at the very top or bottom of your post.
Once you find your image, place your cursor at the end and hit Enter to create a new line (this just makes it easier to see your image code and gives you room to work)
Copy and Paste the Hidden Image Code to hide your pin image on the new line you just created:<div style=”display:none;”>PASTE IMG CODE HERE</div>
Step 9: Insert the code
Highlight the entire Image Code you located in Step 8 for your pin image and Cut & Paste it into the Hidden Image Code area that says “PASTE IMG CODE HERE.”
Step 10: Switch back to the Visual Editor
If you followed all the previous steps correctly, you should no longer see your image! It’s code magic!!
Step 11: Test It!
If you have the Pin It button installed on your browser, you can test out the image by hitting Pin It. Or if you have a plugin for sharing your posts to social media and you select the Pinterest button to share, your hidden image (as well, as any other images that are not hidden in your post) will show up for you to select which image you want to pin to Pinterest.
Hiding Images in the Gutenberg Editor
If you are using the still new Gutenberg Editor, the steps change a little bit. You still want to follow Steps 1-6 above.
Then follow these steps…
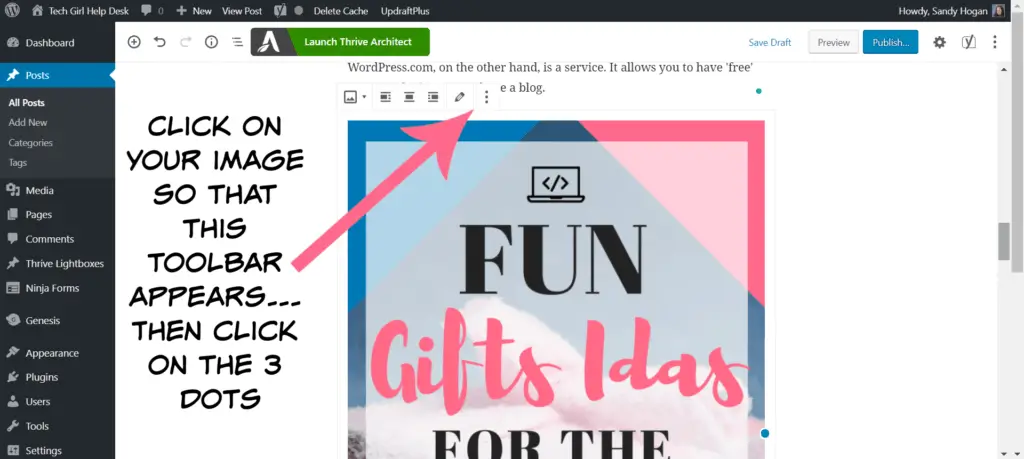
When you click on the 3 dots, you will have this menu appear…
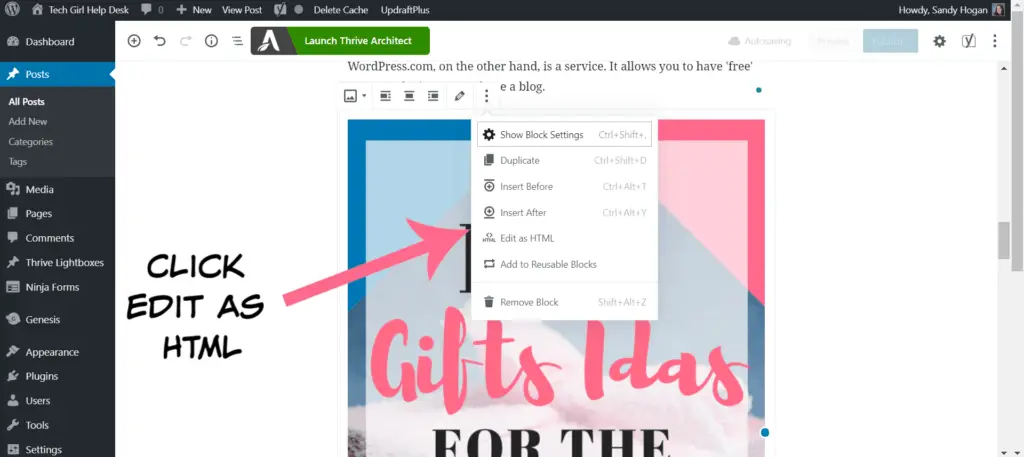
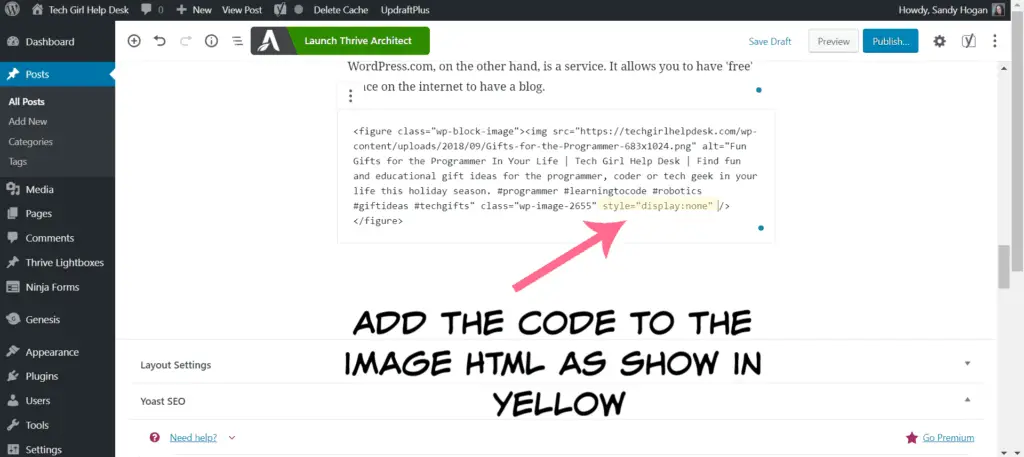
After you click on Edit as HTML, the image will be replaced with the HTML code for the image.
Then a
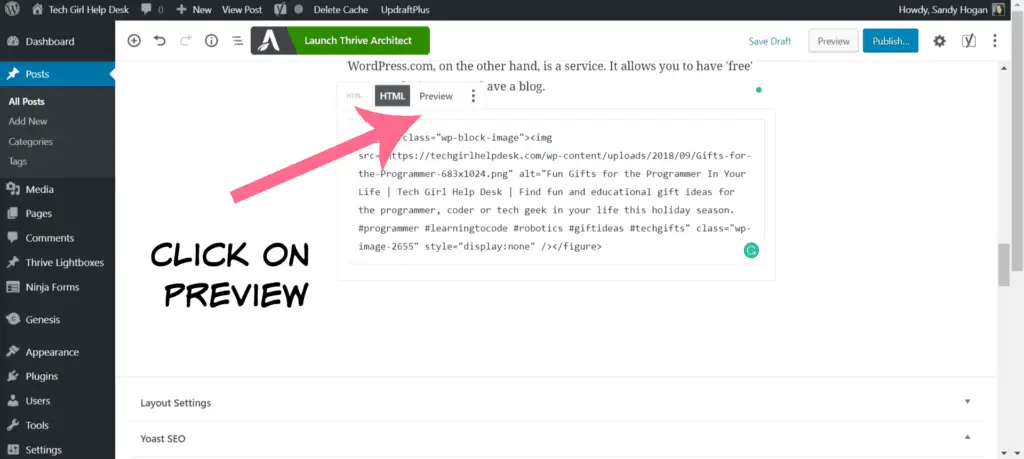
Once you click on the Preview button, it will show you the image as if in the Visual Editor…but notice that the image is now looking a little transparent.
You will need to click on the image so that the tool bar appears, and again click on the 3 dots.
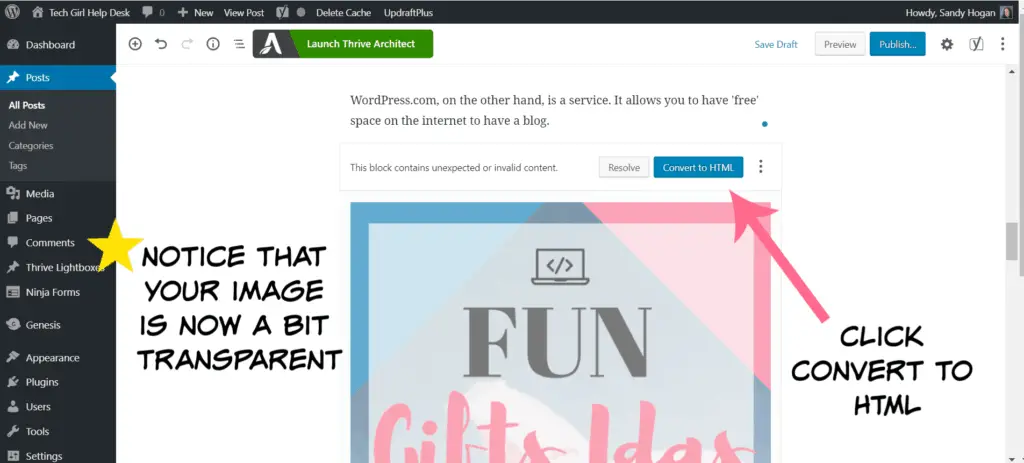
After you have clicked on Convert to HTML, it will bring you back to the code, where you will see the code snippet you added to the image code. Once again, click on that block so that you get the toolbar. This time there will be a preview
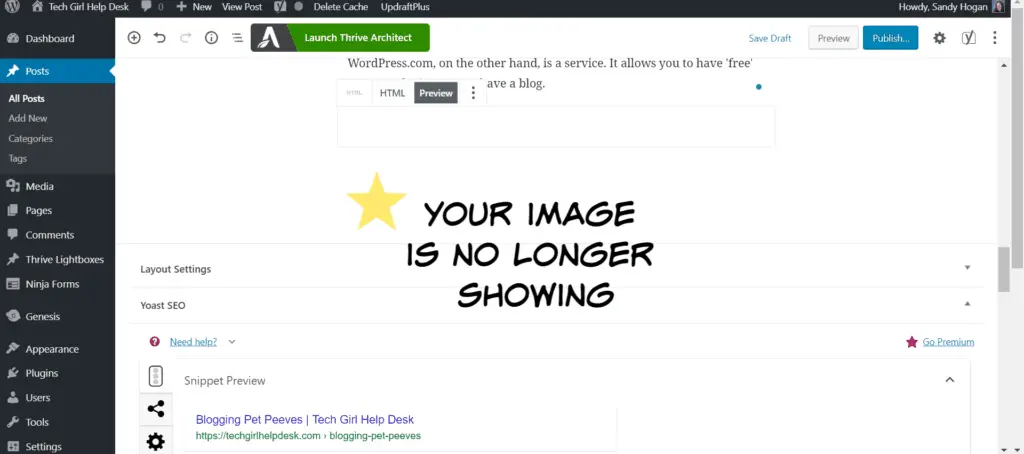
Now your image is hidden in your blog post!
For the more advanced blogging student
The above technique is AWESOME and works just fine! But for those with a little more coding background you might be saying, “Girl, you can hide images even easier than that!”
And it is true. You can just add the CSS directly to the image’s <img> tag itself without wrapping it within a <div> tag.
The code snippet to add to an image element to hide the image would be:
style=”display:none;”

So the code to include this adorable kitten photo would look something like this:
<img class="wp-image-1778 size-medium" src="https://techgirlhelpdesk.com/wp-content/uploads/2018/05/kitten-pink-300x225.jpg" alt="Cute white kitten snuggling in a pink towel | Tech Girl Help Desk" width="300" height="225" />
But to hide this adorable photo, you would add the style=”display:none;” at the end, right after the width and height attributes, but before the closing tag.
So that hidden image code would like this:
<img class="wp-image-1778 size-medium" src="https://techgirlhelpdesk.com/wp-content/uploads/2018/05/kitten-pink-300x225.jpg" alt="Cute white kitten snuggling in a pink towel | Tech Girl Help Desk" width="300" height="225" style"display:none;" />
You can learn more about coding for free at https://www.w3schools.com/ if you are interested.
To conclude
Learning the littlest bit of code can allow you to develop blogging superpowers!! Who doesn’t want superpowers?!?! I have been playing around with code for many years and I still get excited when I am able to tweak little things on a website and see the changes appear in the web browser.
I would love to have you share your blog coding superpowers in the comments below!
P.S. If you missed it, you might want to check out my previous post about how to create those super cool text-boxes like the ones I used in this post.


I just love this kind of techy stuff. Great article! Can’t wait to try it out.
Great tutorial Sandy. As you know, I love code too and yes it’s magic! 🙂
This is so handy! Thank you!
Thanks for sharing this! Who knew it was actually that easy? I am curious though…at one point in time I heard rumors that hiding images could actually be hurtful to your blog (with Google ranking/SEO kind of stuff). This was some time ago, but do you happen to know if this is actually the case?
I don’t know for sure…but from doing a little research on the subject I can’t find anything that says that hiding images hurts your SEO. There is lots of information about ‘hiding text’ that Google will not like but nothing about hiding images. I would think adding images (hidden or not) would be an opportunity to improve your SEO since you can still edit your image title, alt text and descriptions as you normally would with any images you add to your post.
Helpful! Saving this!
Thank you so much for sharing. I have definitely pinned this. I have heard good things about hiding images in your post so I should try and do it more often. And I think hiding images is fine for SEO – I’m pretty sure Google just hates if you hide text, etc.
-Lauren
Girl!!! This is just what I needed. I’ve been wanting to learn more code and you definitely have a great teaching style. I will be learning from you more!!
This just blew my mind!! I had no idea this could be done. You’ve just changed my blogging life, thank you!
Awesome! Glad I could help!