

Custom Styling of Your Ordered List
Customizing an Ordered Lists
Chances are pretty good that if you want to number things, in order on a website, the ordered list (<ol>) is your go-to guy. It also is pretty reasonable to think that you may want to style those numbers. Yet oddly enough, styling those list numbers is not a very easy thing to do. Thankfully, with the help of CSS, it’s also not impossible.
As a blogger, or even as a reader of blogs, you may have noticed that some of the most popular blog posts are list type posts. You know the ones I mean…“Top 10 Secrets for a Stress-free Life”, “5 Must-See Travel Destinations” or “25 Gifts Under $25”. You get the idea.
These posts work in large part due to the attention-grabbing power of the headlines. But they also work because a list makes a very specific promise of what is in store for the reader. This list will not go on for forever and ever. It is a list of 10 Things (or 5 or 25 or whatever) and then it will be over. There is a quantifiable amount of time and attention needed to read this blog post. And as long as you deliver with quality content, you’ll have a satisfied reader.
Plus, these type of posts and articles are perfect for building your authority and demonstrating a mastery of your area of expertise. As a blogger, that’s key.
The Basic Ordered List
Here we have our list of “5 Simple Things” which is created using the numbered list icon in the regular WordPress Editor toolbar. Basic numbered lists are great! And most of the time that is all we need, a simple list of steps or items needed in a recipe or project, and the default settings are fine.
5 Simple Things
- One Thing
- Two Thing
- Three Thing
- Four Thing
- Five Thing
Most of the time this simple ordered list gets the job done just fine (especially if you put it in a text box! Find out how to do that in my post on how to create a text box).
Customized Ordered List
However, once in a while, you want to add a little extra pizzazz to your post or article, like my blogging friend, Karen Gauvreau, who blogs over at Lightly Frayed, who asked me if there was a way to customize the numbers in an ordered list by adding some color or changing the font type or size? (Check out Karen’s list here).
So, after doing a little research I did, in fact, find out how you can customize an ordered list with the help of some CSS (find out more about CSS Basics in this post).
Preparing the Customized List
The first thing I did was to create my “5 Amazing Things” lists the exact same way as my “5 Simple Things” list. I used the ordered list icon in the WordPress Editor toolbar.
5 Amazing Things
- One Thing
- Two Thing
- Three Thing
- Four Thing
- Five Thing
Once I completed writing up my ‘Amazing List‘ as I normally would, I went back to my Visual WordPress Editor and switched over to the Text Editor, using the tabs in the top right-hand corner of my editor.
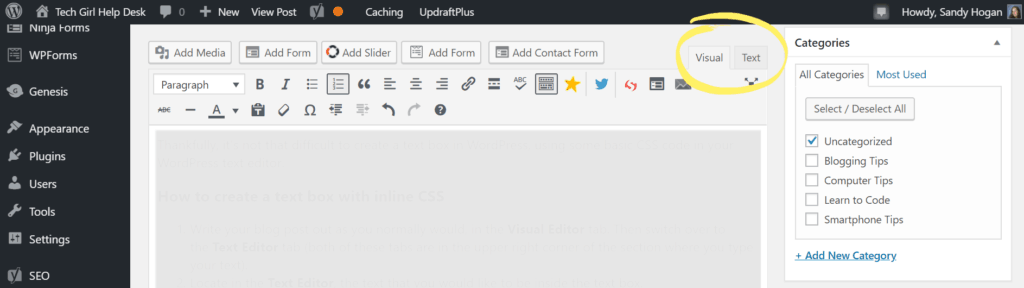
PRO-TIP: Highlight some portion of your list while you are still in the Visual Editor so that when you switch over to the Text Editor you can easily find where your list is.
The code for a basic ordered list looks something like this:
<ol>

<li>Thing 1</li>

<li>Thing 2</li>

<li>Thing 3</li>

<li>Thing 4</li>

<li>Thing 5</li>

</ol>
Class Names
In order to target a single list (and not all the lists on your site), you need to give your new list a custom class name. The class name lets the CSS know that it should apply these new styles to this particular list only.
Class names can be anything you want. You could name it supercalifragilisticexpialidocious if you really wanted to. But if you came back in 6-months or a year from now to edit that code, would that name mean anything to you? Other than maybe having visions of Mary Poppins running through your head.
Best coding practices suggest making class names simple and meaningful. If someone else were to be working with your code in the future they could understand it without you needing to be there to decode it.
So, for my Amazing List, I gave it the class name of ‘custom-list‘…I know, not nearly as fun as supercalifragilisticexpialidocious but it probably makes a little bit more sense.
In order to add the ‘custom-list’ class name, I edited my ordered list opening tag <ol> to look like this:
<ol class="custom-list">
Adding the class name to your code does nothing to your list yet. If you were to save that and switch back to the Visual Editor, your list will look exactly the same.
Once the new class name is given to your new list, go ahead and save your post as a draft so that you can then add your custom CSS.
Editing CSS Code in WordPress
Since WordPress 4.7, users can now add custom CSS directly from the WordPress admin area. This is super-easy and way less scary than getting into editing theme files. You also get to see your changes applied instantly with a live preview.
In your WordPress dashboard, head over to Appearance » Customize » Additional CSS. Here a tab will slide out to show you a simple box where you can add your custom CSS. As soon as you add a valid CSS rule, you will see it applied to your website in the live preview pane.
Customizing Your Amazing List
A simple explanation of customizing your list is that you are basically removing the default numbering that is built into a regular ordered list and then creating a new numbering system for your list.
/* Custom Numbered List */

.custom-list {

list-style:none;  /* this removes the default numbering system */

counter-reset: li;

}

.custom-list li::before { /* this creates a new custom list item numbering */

content: counter(li);  /* system that will increase the numbering */

color:#0077b5;            /*   THIS SECTION IN HERE     */

font-size: 2em;           /*        IS WHERE            */

font-weight: bold;        /*        YOU CAN             */

display: inline-block;    /*       STYLE YOUR           */

width: 1em;               /*      NUMBERS TO            */

margin-left: -1em;        /*  YOUR HEARTS CONTENT       */

}

.custom-list li {

list-style: none !important;

counter-increment: li;

}
PRO-TIP: In computer programming, a comment is a programmer-readable explanation or annotation in the source code of a computer program. They are added with the purpose of making the source code easier for humans to understand, and are generally ignored by compilers and interpreters. In CSS, comments begin with /* and end with */.
Basic Code Snippets
When you begin to learn to code you find out that Google is your best friend! And that learning how to ask Google what you are trying to do is key. (For more Googling tips check out my post Googling like a Pro).
The basic code to style an ordered list I found by Googling ‘how to customize an ordered list’ where I came across a number of sites like this one on styling numbered lists.
Using the Inspect Tool
One thing to keep in mind when customizing a blog or website that may use a WordPress theme (or other platform themes) is that you may find that you will need to tweak your code to work with your specific theme.
Often the code snippets you find are written in a more general sense. Sometimes you need to dig a little deeper to customize the code to work with your site. Using Chrome’s Inspect tool allows you to inspect the code of a specific element on a website or page so that you can then target that specific area.
To use the Inspect tool, hover your mouse over a specific element (heading, image, button etc) and right-click and select ‘Inspect’ in the window that pops up. This will open up a window that allows you to inspect the code and see the HTML and CSS for a specific element.
Wrapping Up
When you are working with code, you are never really finished learning. I have been playing around with HTML and CSS for years and yet, it never occurred to me to try and add custom styling to a numbered list. Yet, when I was asked about it, I found the challenge of figuring out how to do it fun…and cool when it all worked out!

I would love to know if you try out this code to make your very own ‘Amazing Stylized Lists’. Share links to your fun stylized lists in the comments below.


Well done Sandy, I’m sure those who don’t know code will appreciate these easy-to-follow instructions. 🙂
Another perfect post Sandy! I have been wondering about numbered lists on my WordPress theme. It’s very frustrating that everything in my theme is pretty cookie cutter. I’m sure there are ways to customize, but I just don’t have time to figure it out. You make it easy! Thanks. xx
I think most themes are like that…which is why not being afraid to do some customizations with CSS help to make it more fun.
Thanks for sharing this very helpful post. I am scared to play with the CSS. Maybe after reading this, I will give it a try.
With the Additional CSS in the Customizer it really isn’t very scary! If it doesn’t look good in the preview then you can just erase whatever code you have tried. Even if you go ahead and publish whatever changes you made, if you change your mind about it, you can go back and erase it and everything will be back to normal.
Another very helpful post for people like me who start trembling when I think of code! I will share this to my pinterest new blogging board!
Thank you so much for writing this! As a both a blogger and a math student I found this very interesting and helpful and I’d love to use CSS to customise my blog in the future.
Thanks for sharing these great tips, Sandy.
I have to admit that I’m scared to play with the numbers. Even using a numbered list or bullet points seems to throw my blog and my patience out of whack. These step-by-step directions give me hope that I can make my blog look more interesting and more eye-catching.
Thanks for the amazing tips you always share. I look forward to each one.
You broke those steps down that I even think that I could do it! Thank you for the help!
So not only did Sandy help me design what I wanted for my list, but she also wrote this post so she could help EVERYONE do this. I’m sharing this link with all my blogging buddies because it looks so sharp and professional.
Thanks for your patience in helping me set this up, Sandy!