
How to create a text-box in a blog post
Is there a way to create a text-box in a blog post?
Why would you need to create a text-box?
When you are writing a blog post or other content for a website you might need to have a line or section standout from the rest of the post. Knowing how to create a text-box within a post or page is a very simple way to make that content stand out from the rest of the blog post.
Reasons to use a text-box
Maybe you need to share a caution or warning. Or an optional step in a how-to post. These are just a few cases for which you may want to highlight information in your post so that your reader is sure to see it. Using a text-box to make this information pop out is a simple solution.
Example Text-Box: I found a more in-depth tutorial on how to create simple text-boxes in a post from an article by Stephen Cronin at More Than Scratch the Surface.
Thankfully, it’s not very difficult to create a text-box in WordPress, using some basic CSS code in your WordPress text editor.
How to create a text box using inline CSS
-
- Write your post out as you would normally, using the Visual Editor tab. Next, switch over to the Text Editor tab (both of these tabs can be found in the upper right corner of the editor).
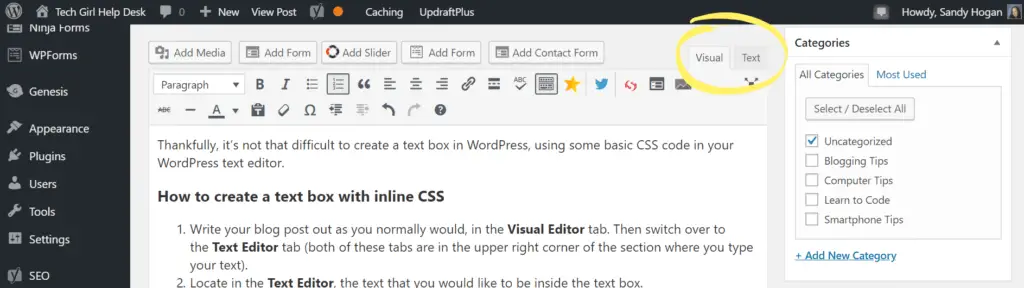

- Find in the Text Editor, the text that you want to be in the text box. *Pro-tip: highlight the text you want in the text-box in the Visual Editor, then when you switch over to the Text Editor, the text will then be highlighted there as well.
- At the beginning of that text (no spaces!), place this line of code:
<p style="padding:2px 6px 4px 6px; color: #555555; background-color: #eeeeee; border: #dddddd 2px solid">(*This exact code will make the box have a light gray background with a border that is a darker gray) - Then at the end of the text you want inside the box, use the closing paragraph tag
</p>(again with no spaces!) - Go back to your Visual Editor and you can view your very fancy text-box.
- Write your post out as you would normally, using the Visual Editor tab. Next, switch over to the Text Editor tab (both of these tabs can be found in the upper right corner of the editor).
Understanding the code for the text-box
<p style="padding:2px 6px 4px 6px; color: #555555; background-color: #eeeeee; border: #dddddd 2px solid">Add your text you want in the text-box here</p>
The <p> and </p> are HTML (Hyper Text Markup Language) element tags that indicate the beginning and the end of a paragraph.
Hint: This type of text box will only allow you to include a single paragraph within the box since it needs to be between a set of opening and closing paragraph tags.
All the rest of the information in the above code snippet is for describing how the text-box should look.
CSS (Cascading Style Sheet) is the code that determines the styling of how your post or page looks. It tells the browser what colors to display and how much spacing and what type of border should be around the text-box.
- The
paddingproperty is used to create the space around the element’s content, inside of the defined borders of the box. So the padding is the space around the inside of the box between the border of the box and where the text is. The numbers (ie.2px 6px 4px 6px) indicates the number of pixel space that should be around each side of the text-box (top, right, bottom, left). - The
colorproperty specifies the color of text. The#555555is a hex color representing a dark grey color. If you want a different color, you can switch out the hex code for whatever color you prefer. - The
background-colorproperty is a little more obvious. It indicates the background-color of an element. So in this case, the background color of the text-box. - The
borderproperty is also pretty obvious, it allows you to specify the color, width, and style of an element’s border. In the code above,#dddddd 2px solidthe first property is a hex code for the color, the second property specifies that the border will be 2px wide and the last property specifies that it will be a solid border.
Editing the code
Knowing what each of the CSS properties is for, allows you to be able to edit the above code and customize your text-boxes however you want.
What if you wanted to make your text-boxes match your brand colors? You could simply switch out the hex color codes for your brand color hex codes.
Brand Color Example Box: Maybe you want your text-boxes to be green with a thick darker green border that is dashed instead of solid.
- This code produces the green text-box with the dashed border above.
<p style="padding: 2px 6px 4px 6px; color: #555555; background-color: #ecf8f7; border: #44bcb3 5px dashed;">What you want in the text-box would go here with a closing paragraph tag
- Find out what other kinds of borders are available with basic CSS at CSS Borders at W3Schools.
More fun with text-boxes
Maybe you want to get a little fancier and just have a border on one side of your text-box.
Option: This text box will only have a border on the left side of your text-box.
- This code produces the above blue box with the border only on the left.
<p style="padding: 2px 6px 4px 6px; color: #555555; background-color: #e6f6ff; border: #4489bc 5px; border-left-style: solid;">What you want in the text-box would go here
Or maybe you want to create a text-box that can sit beside another text-box…
Option: This text box has a border only on the top and is set to a specific height and width. Also in order for these 2 boxes to appear side by side the float (left) property is used.
Option: This text box has a border on either side and is set to a specific height and width. This box uses the float (right) property so that it comes alongside the pink box on the right.
- This code produces the pink box with the top border (on the left)
<p style="padding: 2px 6px 4px 6px; color: #555555; background-color: #ffe6eb; border: #ff6986 5px; border-top-style: solid; height: 200px; width: 200px; float: left;">What you want in the box would go here
- This code produces the green box with borders on either side (on the right)
<p style="padding: 2px 6px 4px 6px; color: #555555; background-color: #ecf8f7; border: #44bcb3 8px; border-left-style: solid; border-right-style: solid; height: 200px; width: 400px; float: right;">What you want in the box would go here
Knowing just a little bit of CSS is a dangerous thing! Look how much fun one can have just styling a bunch text boxes in a blog post!
Basic Coding Skills
Being able to have a basic grasp of HTML and CSS as a professional blogger is a huge bonus. You will be able to add simple things like a text box to your blog and not have to pay someone to do it for you!
Find out more about HTML and CSS at W3Schools.

I would love for you to share any fun CSS tips and tricks that you geek out over. Share them in the comments below!


Thank you so much for this! I’ve been looking everywhere, to no avail, for a plugin that would do this. All the other tutorials wanted me to edit my stylesheet and I’m just not tech savvy enough to do that with confidence.
I so appreciate you taking the time to write out these instructions. Yay!!!
Yay!! I’m so glad that this has helped you out! It is very simple once you get the hang of switching between visual and text editors. Let me know if you need any help implementing it on your own site.
I have the sneaky suspicion that this website is going to be my “go to” site!
Would love to be your ‘go to’ site!! Let me know if there are things you need help with that I could write about.
This is super helpful! I was looking everywhere on how to add text and couldn’t find something I could actually follow. Great Post!
This is perfect!! I always go make graphics when I need my text in a box… you just made life 10xs easier!! But I also feel dumb now because of how easy you showed me it is!!😁
I feel dumb now cause I never thought to make a graphic for a text box!! I am a Canva & PicMonkey junkie so I probably don’t need anymore reasons to spend time making things…but you are a genius!! Although the coding is fun too!!
This is super cool! I love not only how you give the code, but also the background explanation for the different elements so we can switch hex colours etc…. (it makes perfect sense when I read it, but am not sure how I’d go in practice! 😉 )…thankyou so much…
This is so simple, even for a non-techie person like me. Thank you for sharing. I’m bookmarking your site, Sandy. You’re going to be my go-to resource for all things tech.
Thank you for sharing, This is super helpful, Made my day.