13 Important Things To Know About How To Write A Blog Post
You want to know how to write a blog post the right way.
So you’ve written a blog post.
Your mouse is hovering over that Publish button, and suddenly you get cold feet. Have you really done ALL THE THINGS to make this post great?
Use this list of 13 Important Things To Know About How To Write a Blog Post on your next blog post.
What are the most important things you need to Know about how to write a blog post before you hit publish?
1. Optimize Your Post Title
Your post title is one of the most critical factors in SEO and in getting your post out there and noticed. You may have written the best post ever, but if your title isn’t persuasive, engaging and keyword-rich no one will ever click through to read your fantastic blog post.
Crafting engaging titles takes practice and is a skill to be honed. This post by CoSchedule has excellent advice for writing effective headlines and also includes a link to their Headliner Analyzer tool.
Along with being persuasive and engaging, you want your post title to include keywords or phrases that are important for SEO (Search Engine Optimization).
Your blog post title should grab your readers’ attention from the beginning and entice them to read more. Does your title do that?
**This post may contain affiliate links for your convenience. This means if you purchase something through one of my links, I may receive a small commission with no extra cost to you. For more information, see my disclosures here.
2. Check the permalink of your post
After trudging through the mud trying to learn how to write a blog post, now I often start with a working title.
Probably something like the original question that was asked so that I don’t forget the purpose of the post.
While I am writing, I tend to update and improve upon that working title as the post takes shape.
Which means I’ve probably changed the title a few (hundred) times. However, the auto-generated URL that is created when you first start a post is based on the first title you plugged into your post. Which means it’s probably not the most optimized URL.
To ensure that your post stays evergreen, you want to leave off any time references or list numbers you may include in your title. For example, this post is a list of 13 important things to know about how to write a blog post before you hit publish.
However, maybe next week, next month, or next year, you realize there are a few more things you can do to make your post successful. You can go back, edit the post with the new items added to the list.
Adjust the post title with the updated number of items in the list, for example, maybe it is now 15 important things to know about how to write a blog post before you hit publish. The permalink will remain evergreen no matter how often you edit the list because the number reference has not been included.
So now you can add to or delete from this list without it affecting the permalink.
3. Format Your Post Content
Reading information on the internet is a little different than sitting down with a good book. When reading a book, you expect to see page after page of text.
However, when you are reading online, a huge wall of text is enough to make most people click away and find something a little easier to scan and read.
There is an incredible amount of information out there in the World Wide Web these days! Moreover, people live very busy, hectic lives.
So most people tend to scan and skim information first to see if it is something they want to spend their precious time on. Your job as a blog writer is to make sure your content is skimmable and easy to scan so that people can see at a glance exactly what your post is about.
- Use subheadings to help break up larger chunks of text to make your post easier to scan.
- Lists are great for making your post easy to read and skimmable
- Using a quote in WordPress also breaks up your content into more manageable sizes.
Formatting your content is one of the most important things you need to know about how to write a blog post because if someone encounters a wall of text they will likely click away immediately and never read your post!
4. Optimize your post for SEO
You can use a plugin to help you optimize your post for SEO. Yoast SEO is a free, popular SEO plugin that will help you identify where you can better optimize your post.
Yoast uses a ‘traffic light system’ to highlight where your SEO needs improvement. The goal is to get your post to ‘Go Green.’ Don’t stress too much about getting everything just perfect–you can always go back and improve your post.
Pro Tip: If you are using Yoast SEO you will find that a lot of these important things to know about how to write a blog post are incorporated within the plugin.
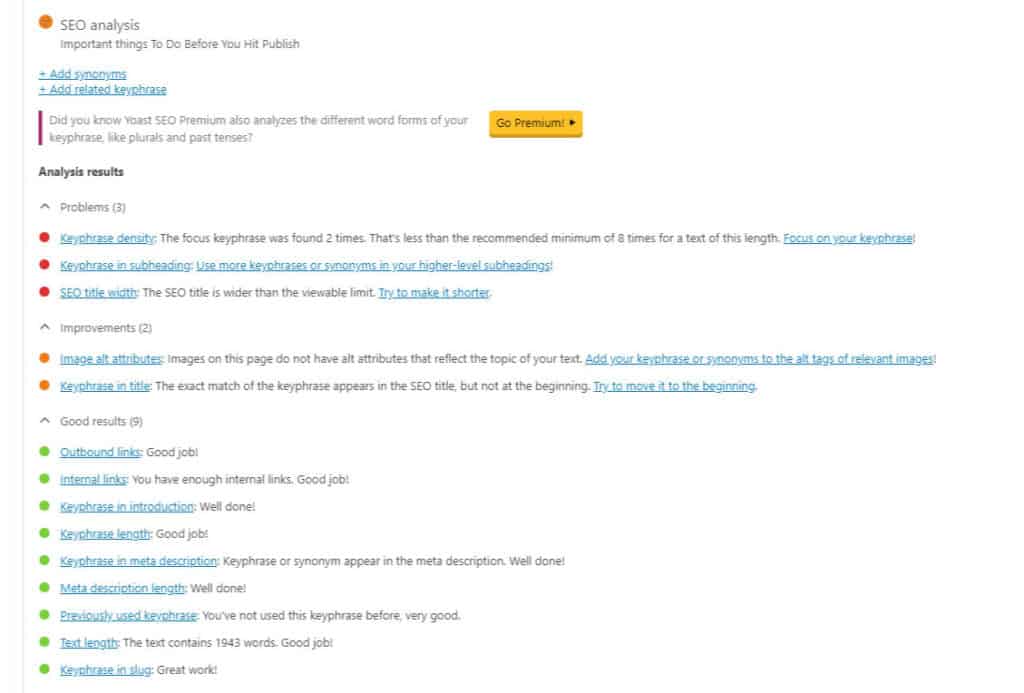
You want to check that you have used your keywords everywhere, not just in your title. Your keywords should be included in:
- First paragraph
- Post URL
- Meta description
- Focus keywords
- In the alt description of your images
- Also, scattered a few times NATURALLY throughout the post
NOTE: Another popular SEO plugin is All in One SEO Pack. However, here on Tech Girl Help Desk, I use the Yoast SEO plugin.
Choose a Focus Keyword or Phrase
When using Yoast, you will find at the bottom of your post a field to select a focus word that describes what the post is about.
This is one of the secret sauce ingredients to how to write a blog post that attracts traffic.
This focus word should be in your title, in the first paragraph of your post and scattered naturally throughout your post. Choosing a well-researched keyword or phrase for your post will help people find what they’re looking for quickly and will improve your SEO rankings.
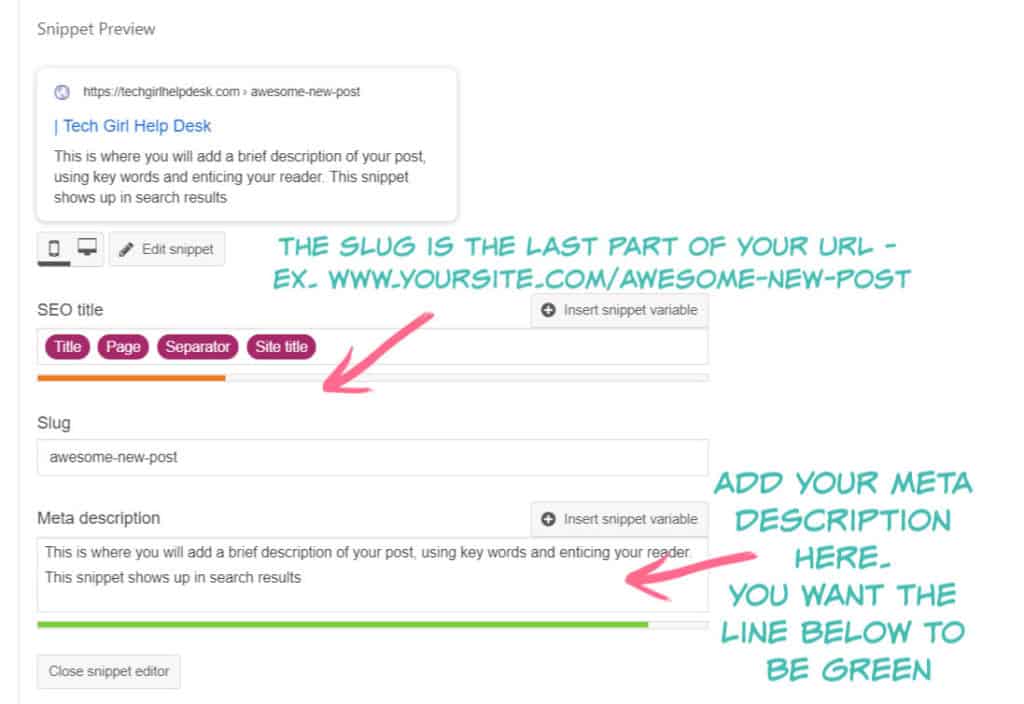
Add a Meta Description
What is a meta description? The meta description is a little snippet of text that summarizes succinctly what your post is about. It is a super important part of the world of SEO.
The Meta description is the little snippet of text that shows up in Google search results that describes what the post is about. You want to draw people in with your meta description by emphasizing your keyword and what your post is about. Use your focus keywords here and make it unique and engaging!

5. Include links to Other Relevant Posts
Once someone finds their way to your blog, you want your new reader to stay on your page as long as possible. The easiest way to do that is by providing links to other relevant posts on your own site.
Internally linking to other content on your site is also good for SEO. It helps Google find all your content faster, as well as, gives Google a better understanding of your site’s structure.
If your blog is brand new, this task may be something you need to come back to when you write more relevant content.
Link to Outbound Sites that Include Relevant Information
It is also important to link to outbound high authority sites with relevant content that supports or gives your readers more information on a specific topic. Outbound links also help a page’s SEO, which is always a good thing.
6. Add SEO-Ready Images
You have probably heard the adage “A picture is worth a thousand words.” Images in your blog post tell a story just as well as, if not better than, a lot of written words.
Adding images is essential for several reasons:
- helps tell your story
- shows steps needed in a how-to tutorial post
- help to break up large blocks of text and make your post easier to skim and scan.
What is an ‘SEO-Ready” image?
Making your images “SEO-ready” just means that you have changed the image name to something that includes a keyword.

For example, instead of image name being “IMG_07242019_1254.jpg,” your image title could be “heart-waffles.jpg.” Can you tell I’m hungry?
Include Pinterest ready image(s)
You’ve probably heard this said before, but Pinterest is a huge source of traffic for lots of bloggers.
Making sure to include Pinterest optimized images in every post, that are easily shareable for your readers, is critical.
Without them, you’ll be missing out on a ton of potential traffic through Pinterest.
It’s recommended to have at least 3 “pinnable” images for each blog post. The images you create for Pinterest should be vertical. Also, be sure to include a keyword-rich, engaging description of what the post is about.
Pinterest recommends that you use a 2:3 aspect ratio for all of your pins. Meaning your pin images should be a little bit longer than they are wide (the width is ⅔ its height to be exact). Examples of image dimensions that represent a 2:3 aspect ratio:
- 600 x 900 pixel (minimum size according to Pinterest)
- 735 x 1102 pixels
- 1000 x 1500 pixels (Pinterest warns that if your image falls outside this ratio, it could get truncated in people’s feeds and they won’t get to see your full Pin)
- 1200 x 1800 pixels
- 2000 x 3000 pixels
Pro Tip: If you are a brand new blogger, and all this sounds overwhelming. Take a deep breath! Relax! Just start with ONE pin image per post. You can always go back and add more pinnable images at another time.
If you are interested in learning more about how to use Pinterest successfully as a blogger, you may want to check out my all time favorite Pinterest course here.
You can easily create beautiful, click-worthy, viral-worthy, images using online services like Canva or PicMonkey. Both of these services have templates you can use for Pinterest images that are correctly sized. I use both of these programs to make all of my pinnable images!
7. Add Featured Image
So simple but easy to forget! Make sure you have included a featured image. Your featured image is the image that will show up automatically when your post is shared on social media.
As well as, usually being the one that may be featured on your home page, main blog page, and on your category pages and searches on your blog. So make sure it is branded and relevant to your post and looks good in a variety of shapes and sizes.
In WordPress, you can find the place to upload your featured image in the right sidebar on the editing screen.
8. Add ALT Text & Titles for All Images
When you upload an image in WordPress, you are given the option to supply an alternative text (alt-text), title, caption, and description. Make sure you supply (at least) the alt text and title for every image.
For the title, you can just say what the image is. Often, I will also include my blog title. So for example, the image above might look like this, “Heart Waffles | Tech Girl Help Desk.”
Also, for both the title and the alt text, make sure they are keyword rich. This will help any images you have included in your post, show up as a featured image for that particular keyword in Google image searches as well.
What is Alt Text?
Alt text (alternative text), also known as “alt attributes,” “alt descriptions,” or technically incorrectly as “alt tags,” are used within an HTML code to describe the appearance and function of an image on a page.
MOZ.com
As someone who has been learning to code for a while, I’ve learned the importance of alt text for an image as an important principle of web accessibility.
- Visually impaired users using screen readers will be read an alternative text to better understand an image on the page.
- An image that can’t be loaded for some reason, an alt text will be displayed in place of the image.
- Alt tags provide better image context/descriptions to search engine crawlers, helping them to index an image properly.
9. Look for Opportunities to Insert Affiliate Links
Depending on where you are in your blogging journey, this may be more of an optional task.
Although if there is the remotest chance that you would like to monetize your blog (even if it’s just a glimmer of hope in your little entrepreneurial brain), I would recommend getting started from day one.
Amazon is a great place to get started if you are looking to get into affiliate marketing. Everyone has heard of Amazon.
They are well-known, dependable, plus they carry pretty much everything. So chances are pretty good you will be able to find products that you love and could recommend, no matter what your blog niche may be. Find out how to get started with Amazon Associates.
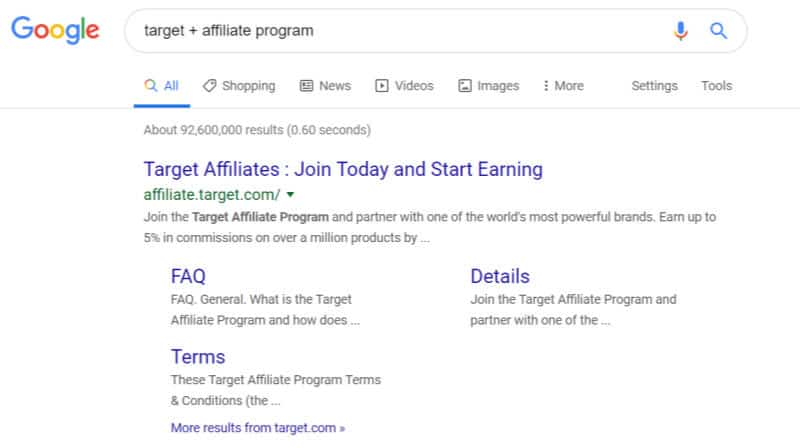
If Amazon is not your thing, then you can search for other affiliate marketing opportunities. You can do a Google search for your blog niche or favorite store plus affiliate program. For example, “Target + affiliate program.”
10. Categorize and Tag Your Post Appropriately
Having an organized category and tag structure will boost your SEO. And make it easier for your readers to find their way around your site.
Categories
Don’t forget to assign a category and tags to your blog post. Don’t leave your post as ‘uncategorized’!
Categories are the main topics you write about and should be used sparingly. For Tech Girl Help Desk, I only have 5 main categories: Blogging Tips, Computer Tips, Learn to Code, Smartphone Tips, and Gift Guides.
You may find that your post fits in more than one category. It is OK for a post to be in more than one category.
For example, my post on how to custom style an order list is about coding and blogging, so I put it in two categories, Blogging Tips and Learn to Code.
Tags
While a category covers a broader topic, tags are more focused and specific subtopics. Think of them more as keywords for a particular post. You can use a few tags, but don’t go overboard, as with most things, less is sometimes more.
There is some debate in the blogosphere about how best to use Categories and Tags so you might want to do a little research for your blog. A good place to start would be this article from WPBeginner.
11. Add a Question at the End To Encourage Comments
By asking a question at the end of your post, you encourage dialogue and allows you to build a relationship with your reader.
Asking a question allows your reader to think a little bit more about the topic and engage with you to continue the discussion. It gives them a reason to leave a comment on your post, as well as an opportunity to ask more questions or even to politely disagree with you.
Asking questions allows your reader to add value to the post by adding additional information that you may have left out or did not know. By giving people the permission they need to disagree with me (politely), it encourages others to wade in and add their two cents as well.
12. Include a Clear Call to Action (CTA)
This is something I don’t see newbies doing when they first learn how to write a blog post.
Always include a clear call to action. What would you like your readers to do next?
- Read another blog post?
- Save for later and pin to Pinterest?
- Share on Facebook?
- Sign up for your newsletter?
- Follow you on social media?
- Download a checklist or worksheet?
Giving your readers a clear call to action keeps them on your site (or social media channels, or newsletter) longer which will increase your engagement and page views, as well as your email list and social media followers.
The call to action is just one more opportunity to connect and to continue building a relationship with your reader.
Not including a call to action is a missed opportunity.
13. Proofread, Proofread, Proofread
You can never proofread enough!
Read through your post a number of times. It may be old school to think this, but I believe that spelling mistakes and grammatical errors undermine your credibility.
And, of course, we are all human and not perfect (trust me, I am quaking in my boots writing this, praying there is not some horrible, glaring, spelling mistake or typo that I missed in my post!), so have a little grace for your fellow writers. However, taking those few extra moments to check and double-check your work is worth it. Take pride in your blog and your writing.
- Check for obvious (and especially, the not so obvious) spelling, punctuation, and grammatical mistakes.
- Read through for awkwardly worded sections. (Often what runs through your head when you’re writing is NOT what comes through to your fingers while you’re typing). Reading out loud is a great way to check for hard to read sections.
- Read over your text to spot errors in formatting.
- Then do it again.
- Also, then ask someone else to do it, if you can.
How to write a blog post – Conclusion
Blogging is HARD WORK! You may have started a blog because you love to write, which is all well and good.
However, if you are looking to build a business with your blog, there is a whole lot more that goes into creating excellent, useful content.
Learning how to write a blog post is not just about writing, as you can clearly see.
If this post hasn’t scared you off of blogging, and you are interested in starting a blog, check out my step-by-step tutorial on how to start a blog here.
There is so much that goes into writing a blog post, and it is so easy to forget things along the way.
That is why I put together this comprehensive list of important things to know about how to write a blog post on your next blog post.
If you have found this post about 13 important things to know about how to write a blog post helpful, consider sharing!
13 Important Things To know about how to write a blog post Before You Hit Publish – Save for Later!

I’d love to hear if there are other things that you think are important to do before you hit publish on your blog post. Share in the comments below.






Thank you so much Sandy for this list. I know that when I’m writing a post, I’m in the creative zone. Once it’s done I can’t wait to hit the publish button. I often forget a few things, so this printable reminder is great!
Thanks for this Sandy, super informative and concise! I will be using the printable reminder with every single post from now on. You’ve made it very easy to do a quick check and review from now on. No longer left with that nagging feeling after I hit publish of, “Uh…I feel like I forgot something.” LOL thanks again, great post!
lol…I do the same thing with changing my title several times. I also stress out about the SEO being a happy green face. Doesn’t always turn out that way but I try to get close.
Thank for sharing this information because I sometimes forget to do these things!
You’ve got some great advice here! I recommend the Yoast plugin to everyone I know that’s looking at boosting their SEO efforts.
I made the mistake of changing my permalinks after 30 posts! It took so much work!
I’ve been meaning to look into Tags for my posts, thanks for the nudge!
Thanks for this list. I think we underestimate the tasks we perform when finishing up a post or past! Having a good list helps us not forget steps. And gives us the reason we deserve a STAR for getting it done.
It is very overwhelming especially when you’re new. Thanks for a great list to use as a check list.
Great post, this is a checklist every blogger should check off before publishing!